*taptaptap*

Is this thing on?

Is anyone still reading this blog? I hope so! Now that the harvest season is winding down, I’ll be writing a bit more here: wrap-ups from our multitudinous summer events and also some thoughts on Preserving Traditions, lessons learned, and thoughts for directions as the group moves forward. Your thoughts are very much appreciated!

Look for posts in the coming days…

Emily

Hi, folks!

I realize I’ve not been writing much here this year – event wrap-ups and such. I really overdid it last year, and not blogging has been a way for me to keep the activities coming while staying somewhat sane.

I did want to share this, though: come instructions for making very large batches of salsa in a group. And here’s a pic of the group that made 79 pints in August!
2010 Salsa Day

The salsa recipe

We’ve used this recipe two years in a row at our salsa canning work days, and it’s worked out very well. It’s from the National Center for Home Food Preservation and has been tested to be safe for water-bath canning. You can use any combination of sweet and hot peppers to yield the quantities listed, and you can add more spices (garlic, cumin, salt, etc.) but don’t alter the basic proportions of tomatoes-peppers-onions-lemon juice.

Use paste-type tomatoes (romas, Amish paste, etc.) so you don’t have to cook it forever to get it to thicken up. I’ve also found it helps to bring half a cup of cayenne pepper to the workshop so you can adjust the heat without throwing off the rest of the recipe. Our peppers have not had much heat the last two years, and the cayenne really helped keep the spice lovers happy!

Paste tomato salsa
Yield Unit 13 pints x2 batches x3 batches x4 batches x5 batches x6 batches
Tomatoes, chopped Quart 7 14 21 28 35 42
Onions, chopped Cups 5 10 15 20 25 30
Jalapenos Cups 1 2 3 4 5 6
Sweet long chilis Cups 3.2 6.4 9.6 12.8 16 19.2
Garlic Cups 0.4 0.8 1.2 1.6 2 2.4
Lemon or lime juice Cups 2 4 6 8 10 12
Salt Tbl 2 4 6 8 10 12
Cumin, ground Tbl 2 4 6 8 10 12
Oregano Tbl 2.4 4.8 7.2 9.6 12 14.4
Black pepper Tbl 1 2 3 4 5 6
Cilantro Cups 0.6 1.2 1.8 2.4 3 3.6
Finished pints 13 26 39 52 65 78

This chart should be extremely helpful to figure out how much of each dry, uncut ingredient to bring to yield the quantities of chopped materials listed above. There’s always some uncertainty when changing between weight and volume, so take the measurements below with a grain of salt and be sure you measure your chopped ingredients as you stir things together. Don’t add those extra two onions just because you have them; you have to increase the recipe in correct proportion. The numbers below should err on the side of having too much of something. Chop some stuff, measure, and then chop more as needed so you don’t end up with 3 spare quarts of tomatoes but no extra onions.

Updated 8-28-13

What to bring (one 13pt batch) By weight By volume By the piece
Tomatoes, whole Pounds 14-15 Dry quarts 9 (1 peck) Small romas 60?
Onions, whole Pounds 2.5 Dry quarts 1 heaping Medium 6-7
Jalapenos, whole Pounds 0.5 Dry pints 1 Peppers 10
Sweet chilis, whole Pounds 2 Dry quarts 2 Large Bell peppers 5-6
Garlic, bulbs Pounds 0.25 Dry pints 0.25 Bulbs 2

When putting together your list of what to bring, you may end up dividing up shares like this:

  • 5 pounds of onions
  • Another 5 pounds of onions
  • 4 pounds of jalapenos
  • 3 pounds of sweet peppers
  • Another 3 pounds of sweet peppers
  • 4 large bulbs of garlic and a quart of lemon juice
  • 4 large bunches of cilantro
  • 2 more quarts of lemon juice
  • All spices (usually easiest for the organizer to bring)

Tomato conversion chart (pounds, quarts, bushels, etc.)

Tomato conversions Bushel Gallon Peck Quart (dry) Pounds Quart (diced) Pint (diced)
One bushel 1 8 4 32 53 17-20 35-40
One peck 0.25 2 1 8-9 12 4-5 9-10
One canner load, or the recipe above (7qt) 0.25 1 8-9 13-14 14 9
One quart 1.5-2 2-2.5 1 2

Organizing who’s bringing what

Here’s what I do:

  • Ask for people to RSVP. My kitchen at the Grange can hold 10 people, max, so I set the limit at 12 because someone always has to miss at the last minute.
    • Be sure to think about how much stove space you have. At the Grange, we have 2 electric stoves. Each stove holds one canner and one pot of salsa. We also have 2 portable butane burners that each hold a 10-qt pot for cooking down salsa. Cooking the salsa down is what takes the most time – 30-45 mins for each big 8qt batch.
  • Once I know how many people are coming, I decide how much salsa we’re going to make. I usually aim for about 8 pints per person.
  • Then I divide up the ingredients. Each person brings a share of tomatoes, plus one other share of other ingredients. I use Doodle to have people sign up for their shares online, but use whatever’s convenient for you.
  • Be sure you have canners, big measuring cups, bowls, and large cooking pots, spoons, etc. You can use quart or half-gallon canning jars to measure ingredients in a pinch. I like having restaurant-style ingredient tubs with cup/quart markings on the side. You may want to use Doodle to have people sign up to bring equipment as well as ingredients.

Running the workshop

  1. Sanitize all counters and sinks (1 gal water + 4 drops bleach; use new sponges)
  2. Rinse out all bowls, tubs, colanders, etc. if they are new or have been in storage.
  3. Finalize quantities; determine if any additional ingredients are needed.
  4. Tape a copy of the recipe next to each cooking station. For example, a 10qt pot can hold one batch of the salsa listed above (makes 13 pints), so write out the recipe for one batch.
  5. Wash tomatoes.
  6. Start chopping ingredients. As ingredients are chopped, whoever dumps that ingredient into the pot marks off what they’ve just added on the recipe sheet. So, if I add 4 quarts of tomatoes, I put 4 hash marks next to the “7qt chopped tomatoes” line on the recipe. That way, everyone knows when a particular pot contains all its required ingredients.
  7. Start heating water in canners.
  8. Start cooking the salsa as soon as there are a couple quarts of tomatoes in the pot. Add the fresh herbs in the last 15 mins of cooking. Aim to get one batch of salsa cooking before all ingredients are chopped.
  9. Wash jars and place in canners or oven to warm.
  10. Warm lids in saucepan.
  11. Continue to cook salsas until they are thick.
  12. Start cleanup as soon as all ingredients are chopped. You’ll be done chopping long before the salsa is done cooking.
  13. Can salsa – water bath 15 mins per pint/20 mins per quart.
  14. Finish cleanup.
  15. Listen for the “ping”!
<a href=”http://www.flickr.com/photos/espring/4917661977/&#8221; title=”2010 Salsa Day by espring4224, on Flickr”><img src=”http://farm5.static.flickr.com/4095/4917661977_43b25b514b.jpg&#8221; width=”500″ height=”375″ alt=”2010 Salsa Day” /></a>
buttermaking

Presenter Holly White, looking suave, and Emily creating a small buttermilk explosion. Photo by Penny Corbett.

I think our May 2nd workshop was the best workshop ever that didn’t do what was intended. Thirty people attended – our second-best-attended workshop ever – to see how to make three dairy products from scratch: creme fraiche, butter, and mozzarella cheese.

Get the workshop handouts here!

Creme fraiche (sorry, I’m not sure how to do the accents in WordPress…) is often called “French sour cream.” It can be used the way you would sour cream, though it has the advantage of not separating when heated, the way American sour cream does. Making it is simple; mix some cultured buttermilk into cream and let it stand at room temp for 24-48 hours until thickened. (Full details are in the downloadable recipe handout.)

Our presenter, Holly White of the Detroit Zymology Guild, also explained a bit about the two types of buttermilk. The liquid left after you make butter is “true” buttermilk. The kind you buy in the store is “cultured” buttermilk. Both are great in pancakes, but only cultured buttermilk can be used to inoculate other milk to make cultured dairy products like creme fraiche and cheese.

pennysButter

Butter made at home by workshop attendee Penny Corbett. Photo by Penny.

Butter is also quite easy to make at home: just pour cream in a jar and shake. We’ve probably all done this at some point…but Holly explained to us about the importance of “washing” the butter to get all the watery liquid out. Any liquid left in the butter will cause it to spoil more quickly, so you need to press the butter against the sides of a bowl to encourage all the liquid to come out. Rinsing the lump of butter with cold water helps this process, especially early on. It’s easiest to do this if you stop shaking the butter at the “grainy” stage, and before it forms a solid brick.

Finally, we moved on to the cheesemaking…and this is where things went a bit awry. We were aiming for mozzarella, but we ended up with ricotta. The ricotta was delicious, though it was disappointing not to get to stretch the mozzarella. We thought the problem might be with the portable butane burners we used – you need to heat the milk very slowly when making mozzarella, and it was hard to keep the burners at a very low flame.

Well, our intrepid workshop leader Holly spent the better part of the next week experimenting to figure out what happened, and determined that it was the milk that was the problem. The short version is that apparently Calder milk is pasteurized at too high a temperature to make mozzarella. Here’s her assessment of the situation:

I’ve tried 4 more batches with Calder’s “natural” milk, and I get the same result we got on Sunday.  I replaced my citric acid, I tested the rennet and I switched to a double boiler.  Still got ricotta.

I called Calder, and they told me they do low-heat pasteurization.  But the problem is certainly their milk.  This is exactly what happens when it is overheated- it won’t set and you get those little grains for curds.  It’s just that in this case, the overheating happened at the plant.

So I switched brands [of pasteurized milk] and it still didn’t work.  So going forward, I’m not teaching mozzarella unless I can do it with raw milk.  Illegal food workshops, hooray!

I called some chef friends for troubleshooting, and found out from one of them that Zingermann’s uses raw milk in their mozzarella workshops.  Interesting, huh?  And that they also use commercial curds to make their “in-house” cheeses.

Holy cow. The fancy-schmancy local creamery uses pre-made curds to make their mozzarella? Interesting, indeed!

I intend to have another cheese workshop in a few months featuring cheeses that are less fussy about their milk – paneer, farmer’s cheese, etc. I will test the recipes with readily-available milk products.

A question for the peanut gallery: If we can’t get commercial pasteurized milk to make a decent cheese, would you rather I used raw milk (which is hard to find and quite expensive) or just not have another cheese workshop at all?

Way back in March, we had a workshop on condiments. Several folks have reported back to me with the results of their experiments, and I have been neglectful in posting them. With no further ado, here are some of our favorites:

Suzie’s Fat-Free Mustard Vinaigrette

  • 2 Tbl. balsamic vinegar
  • 1 Tbl. spicy prepared mustard (a dijon mustard works well)
  • 1-2 Tbl. white vinegar
  • 1-2 Tbl. water

This is especially good if there’s bleu cheese in your salad, but then it’s not fat-free any more. 😉

Julie’s Balsamic Mustard

Julie took the basic grainy mustard recipe and jazzed it up a bit:

  • 1/4 c. water
  • 1/4 c. balsamic vinegar
  • 3 Tbl brown mustard seeds

Combine and let sit overnight; the next day, blend in the blender to crack the mustard seeds. Here’s what Julie says about it:

The mustard I made with the balsamic vinegar, EVOO and brown mustard seeds TOTALLY ROCKS!  The entire family loves it.  Since it was already on the spicy side I just took the other odds and ends of spicy and dijon mustards from the refrig, stirred them in, and they are now all consolidated into a fabulous all purpose mustard.  I can’t imagine ever buying prepared mustard again, this was so easy and the results were so unexpectedly stupendous!

Julie’s Balsamic-Orange Peel Dressing

Vinaigrettes can be made by combining equal parts oil, vinegar, and water, buy you can play with the particulars with stunning results. Here’s Julie’s variation:

  • 2 Tbl. Balsamic vinegar
  • 2 Tbl. Extra-virgin olive oil
  • 1 Tbl. Honey
  • Fresh lemon thyme (leaves from one sprig)
  • 1 tsp. Dried orange peel

Julie’s comment:

All I can say is that I have made it three times since then and it has become another staple on our table!

Diana’s Grove Garlic-Bleu Cheese Dressing

This is a fave from a retreat site I’ve visited in the past.

  • 1 c. mayo
  • 1/2 c. sour cream
  • 2 tsp. Worcestershire sauce
  • 1/4 squeezed lemon
  • 1/4 to 1/2 c. bleu cheese crumbles
  • handful of chopped parsley (dried)
  • salt and pepper to taste
  • A whole lot of crushed garlic

Emulsifiers for salad dressings

We all know water and oil don’t mix – at least, not without the help of an emulsifier. We discussed using cream, yogurt,  mayonnaise, and even mustard as emulsifiers. Member Carol kept her eyes peeled, and when her issue of Cook’s Illustrated arrived, sent me this note:

Just got a newsletter from Cook’s Illustrated that had a video about vinaigrette emulsifiers.  They tested mustard, mayo and egg yolk.  Winner was egg yolk, which caused vinaigrette to stay together for 3 hours (as opposed to mustard – 30 minutes – and mayo – 1.5 hours).  They decided, however, that the egg yolk made the vinaigrette too eggy tasting, so they decided a mixture of mayo and mustard was the best solution.

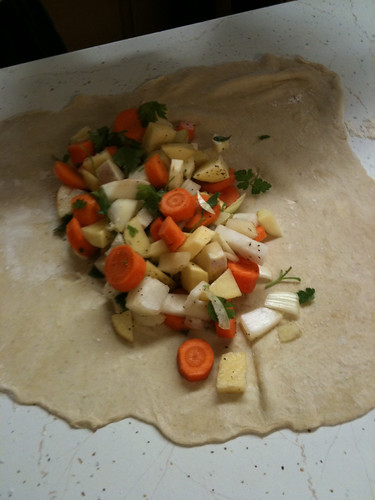
Vegetarian pastyPreserving Traditions member Dennis Purcell led us in a great workshop on how to make pasties on April 4th.  Here’s the recipe, for anyone who missed it!

Pasty crust recipe

The dough is similar to pie crust dough, but is a little less flaky and a little more sturdy. You can omit the salt and/or sugar, if you like.

For 4 large pasties

  • 4 c. flour (all-purpose is best, but you can use whole wheat flour, too)
  • 3/4 c. solid shortening (Crisco, butter, lard, palm oil. etc.)
  • 1+ cup of water (start with one cup and add more as needed)
  • 1/2 tsp. salt
  • 1 tsp. sugar

Pasty filling recipe

Dennis tells us pasties can be filled with almost anything. He likes this mix because it’s not greasy, and has a lot of vegetables to go with the meat. You can omit any item, but you want to end up with about 3/4-1 cup of filling per pasty. Dice all the vegetables to the same size – about 1/4″ – so they cook evenly.

For 4 large pasties:

  • 1/2 pound ground beef
  • 1/2 pound ground pork (or use a total of 1 pound of ground beef; meat may be omitted for vegetarian pasties)
  • 1 cup diced potato
  • 1 cup diced onion
  • 1/2 cup diced carrot
  • 1/2 cup diced rutabaga
  • 1/2 cup diced turnip
  • 1/2 cup diced parsnip
  • Minced fresh cilantro and parsley, to taste
  • Salt and pepper to taste

Mix the filling in a large bowl with your hands so all ingredients are distributed evenly.

To assemble the pasties:

Roll out the dough in an oval, about the size of a pie crust. Add up to a cup of the filling on one half of the dough – be sure you don’t over-stuff your pasty, or you won’t be able to seal it shut. You may dot the filling with butter, especially if your meat is lean or if you are making a vegetarian pasty. Fold the dough over to make a half-circle shape; fold and crimp the edges to keep the filling sealed in. Slash a couple steam vents in the top and bake on a greased sheet at 375 for about 45 minutes.

Legions of jarsHello, hello to all of you visiting from Jennifer McMullen’s article on the Ethicurean web site. Take a tour around the site, learn a bit about the group, see some photos of the group, peruse the store for “Yes. We Can.” items, and see what events we’ve got coming up in Ann Arbor and West Bloomfield, Michigan.

If you are interested in starting a branch of Preserving Traditions in your town, or in attending a “train the trainers” session, see the “Start Your Own” page or contact me at preservetrad@gmail.com.

Emily

A nice crowd (was that 10 people?) participated in Sunday’s workshop on ketchup, mustard, and salad dressing. Even though Kraft and Heinz would like you to think these things are something only they can make, about half our folks had made at least one of these items before at home. It made me thankful, yet again, that we still have some traditions to preserve, and we aren’t starting entirely from scratch!

Download the workshop’s condiment recipes here.

Ketchup basics: Ketchup is made from concentrated tomatoes (simmered-down puree or even tomato paste) and seasoned with vinegar, salt, sugar, and a somewhat surprising blend of spices: cinnamon, allspice, cloves, cayenne, and sometimes onion and garlic. Two recipes are included in the downloadable recipe packet.

Mustard basics: The type of mustard seed you use really matters! Don’t use all brown or black mustard seeds; use some yellow ones as well. The darker mustard seeds have a more bitter flavor and can be overwhelming if used alone. Dried mustard powder can be used alone or with whole mustard seeds, depending on the kind of mustard you want to make. If using whole seeds, soak them overnight in water and vinegar so they’ll crack open when you put them in the blender the next day.

Mustard changes flavor a lot over time. The first day you mix it up, it might be too strong (hot and/or musky) to eat right away. Let it mellow a week or more in the fridge, and it’ll probably taste much better. An exception to this is mustard made from mustard powder and water or vinegar. If you want nose-searingly hot mustard, make it just before serving and don’t bother saving the leftovers. Like wasabi, it’ll singe your nose hairs but lose potency over time.

Salad dressing basics: Salad dressing is usually a variation on oil + vinegar + spice. Since oil and water don’t mix, you either need to constantly re-mix it, or find some kind of emulsifier (a substance that binds the water and oil together). Xanthan gum is commonly used to emulsify commercial salad dressing; we also discussed whether prepared mustard can help salad dressing stay emulsified.

Homogenized dairy and mayonnaise are both emulsions, and they can help emulsify other ingredients. Ranch dressing, for example, gets its sourness from buttermilk and yogurt or sour cream and its fat from mayo. (You can also leave the mayo out for a thinner, lower-fat dressing.)

A standard vinaigrette traditionally has two parts oil to one part vinegar – but you’ll want to use a tasty oil (like a good olive oil) for this. Participants also have made good dressings with 3:1 or 1:1 oil and vinegar. It depends on what you like, and how good your oil tastes. Classic French dressing is just a vinaigrette with paprika. The simple Honey French dressing in the recipe packet has equal parts oil, vinegar, and honey with some paprika and salt. The honey thickens it enough to be distinct from a vinaigrette, but it’s not so “ketchup-y” tasting as other “French” dressing recipes.

Folks made their own salad dressing and mustard concoctions at the end of class. some of them needed extra ingredients, or time to let the flavors blend. Folks, report back here with your results! I’ll re-post the recipes when they come in.

Learn to make basic condiments – ketchup, mustard, and salad dressings – with Preserving Traditions. This will be part demo, part hands-on workshop, due to the time involved (overnight soaking, etc.) andthere will be a number of varieties to sample!

Bring at least half a cup each of any type of vinegar and oil. You may also bring fresh herbs, crumbly cheese (feta, bleu, etc.) if you wish. Also bring a couple small jars if you want to take home samples.

March 14, 2pm
Pittsfield Grange
$5; free for Grange members

Ok…I need reviewers interested in Preserving Traditions to go to http://preservingtraditions.org/join.html, scroll down about halfway, and let me know what you think of the workshop outlines. The idea is to lay out everything a would-be presenter needs to know to run a workshop on a particular topic (assuming they are able to do the skill in question, but just need some help turning that into a workshop).

I also hope that other people will take the template and start submitting their own workshops (Mary…how ’bout writing up your pierogi workshop?) for inclusion on the site. You can submit your own workshops to preservetrad@gmail.com.

Ah, and I think I need to run my own instance of WordPress’s blog on pt.com so I can set y’all up as authors without having to get your own WordPress login…so much to do…it’ll happen, albeit slowly…

Preserving Traditions member Lauren Zinn is now giving educational tours of southern exemplary Michigan farms. Here’s the info – check her out!

LAUREN ZINN AGRITOURS

• Experience guided tours of working urban, suburban and rural farms.

• Learn how sustainable practices are making a difference.

• Engage in inspiring conversation with the stewards and farmers whether they manage 400 acres or 400 feet.

• Participate in demonstrations.

• Develop ideas for applying sustainable practices in your own life.

SPRING SERIES 2010 Agritours

#1:  A School Farm in Detroit, MI –Saturday, April 17th

A 2 acre farm including horses, goats, chickens and a garden serve as an alternative biology and chemistry lab for the pregnant teens who attend this school.  Imagine the possibilities for all schools.

Onsite: 2:00-4:-00 $25/Adult  $10/Student  Reservation deadline: April 3rd

#2: A Horse Farm in Chelsea, MI – Saturday, April 24th

This small, efficient farm of 5 acres includes horses, a garden, woods/pond and features energy conservation/green building and the social structure for intentional community living. Experience the horsepower behind this little place.

Onsite: 2:00-4:00 $25/Adult  $10/Student Reservation deadline: April 10th

#3: An Urban Farm in Ypsilanti, MI –Saturday, May 1st

Tour a residential backyard of chickens, goats, rabbits, garden, and greenhouse– all thriving!  Learn the secrets of efficient and sustainable micro-farm management.

Onsite: 2:00-4:00 $25/person $10/Student  Reservation deadline: April 17th

#4: An Amish-Style Farm at Community Systems Learning Center in Camden, MI (Hillsdale) – Saturday, May 8th– Sunday, May 9th MOTHER’S DAY SPECIAL

Amish style houses and a wind tower built from scratch grace this 380 acre property in Amish country.  See the Barn become a hands-on renewable energy classroom.  Learn how an alternative approach to science education can lead to innovative and sustainable solutions to global problems.

Onsite: Noon, Sat, May 8th, to Noon, Sun, May 9th (Mother’s Day Breakfast)

$100/adult ($50/student) ($75.00/adult with tent after house spots fill up.) Option to attend Saturday only: $70/Adult  Reservation deadline: April 24th

For more information and registration, please email: laurenzinn@gmail.com

School group agritours are also available.